
First of all, let me start off by saying I have not received any solicitation or compensation to write this post. I honestly just want to share the number one app that has made my life easier. If I can help other busy moms save a little time and money by sharing, then I have done my job.


So what one app has made my life as a mother of six easier? Menu Planner. There are other menu planning apps out there, but this is the one I chose based upon reviews I read and the functions it offers.

So how has this app made my life easier? Menu planning and incorporating new recipes into our diet is a snap. Grocery shopping is streamlined. As we run out of items at home, I can throw them on the "list" and not lose the list since it is on my digital device. (In my case it is my iPad). I am notorious for losing small slips of paper.
I have a large family of eight, and groceries can take up a large portion of my budget. I learned a long time ago if I have a plan for our meals and go to the store with a list of all the ingredients I need for that plan, I save money in several ways. I save money because I can plan our meals around weekly store specials. I save money because I only buy what I need on my list. Sticking to the list cuts down on impulse buying and duplicate buying. (How many times have you gone to the store, come home and realized you already had an ingredient?) Using a list also cuts down on the likelihood you will forget an ingredient and have to make a second trip back.
Menu planning is great, but finding the time to go through my recipes, find the meals, and record the ingredients needed was a challenge. Even when I planned a week with most of our favorite recipes I would often find I had forgotten a key ingredient like green onions. And with six kids I would often be interrupted when I was trying to plan. If I left my cookbooks and recipes out, I would have a big mess to clean up later. I honestly came to dread meal planning time.
This app changed all that. It took a little bit of time to set up, but once I had my recipes in, all I need to do is find a few minutes here and there to pick the meals and fill the calendar. Most of the time a few minutes here and there is all I get.

A filled calendar from several months ago. Sometimes when a recipe makes less than what my family needs, I put it in the calendar multiple times to make sure I can double or triple a recipe.
Being able to plan my meals has made a world of difference in my family. And the best part is once I'm done putting in my meals, it automatically generates my grocery list.
My grocery list. See the sections of the grocery store? I love it! It saves me running back and forth and missing ingredients in an aisle.
If I find I have a spare ingredients at home I can look up recipes by the ingredients for her want to have a recipe calls for half of the bell pepper I can easily look for an second recipe use the other half of the bell pepper and therefore no waste. I can also assign prices from several grocery stores as well as choose the section of the grocery I will find the item. The list is categorized by grocery department.

You can see I've assigned cheese to "dairy" and the provided place for the store prices.
Some of the other recipes that call for shredded cheddar cheese. I don't use many of them these days since Baby Girl is allergic to dairy, but you get the idea of how you can look for other recipes to use.
There is a pantry function which keeps track of items on hand and you can set it up to populate the grocery list when it gets low from use.
If I had a recipe that called for any of these items and I didn't have any on hand, it would show marked in the "list" column as well.
The app also let the auto import recipes from the sites. My favorite is Taste of Home and Food Network. I used to be a subscriber to "Taste of Home," and now I have access to the recipes through Meal Planner.
The import recipe screen. You click on the bookmark icon and it pulls up the compatible websites. You can also type in the URL in the top bar and do a manual import from that site. This is a great option for food blogs.
I will warn you that occasionally when you auto-import a recipe it will put the size of an item you need in the ingredient name so instead of listing the zucchini as 1 medium, it will list medium zucchini, 1 instead. It's not really a big deal, but I just like to have fewer items on my item list and use the quantity section to tell me size. I just copy and paste the sizes to go into quantity section to solve the issue.
You can input recipes of your own as well, and the more ingredients you
enter, the easier it becomes to pick from the drop down menu. You have
the option of adding photos if you want.
There are several ways of entering in ingredients for a new recipe. Typing by hand, copying and pasting from a list, or choosing from a drop down list of ingredients (once you've built it up).
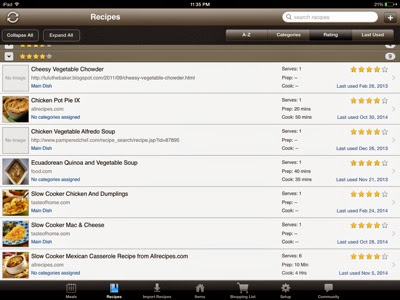
The recipes allow you to rate them on a scale of five stars. When we try a new recipe, I asked the family their opinion and we rate it. This lets me easily know whether or not it's a meal to make again.
This was a pretty popular meal.
When I am looking at recipes, I can sort them by a number of methods including the last time I used them. When you choose that option, the "Never Been Used" recipes show up first. It makes it easy to keep your meal rotation fresh and fun.
Our "Never Used" recipes.
Looking at the recipes from A to Z.
I can look at my planning by a month week or daily view. When I look at the overall picture I can balance out our meals and make sure that we don't have too much too much beef, chicken, fish or vegetarian meals in a row.

Daily view of the meal planner.
Meal planning is so much more fun since I got this app. It is only $2.99 and it really has made an important "mom job" easier.
Do you have other suggestions for apps that have made your life easier? List them below in the comments.
